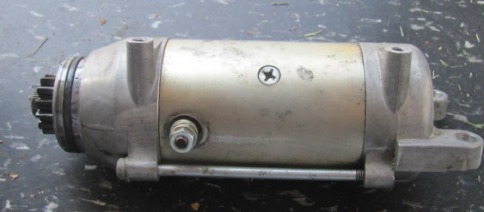
Old Starter Sitting on My Garage Floor
Howdy Again Everyone,
In my last blog I talked about my first steps to repairing the starter system on my XS70E. I talked about testing the solenoid and battery. The next step I had to undergo was testing the starter motor. This whole process is described below.
In my last blog I talked about my first steps to repairing the starter system on my XS70E. I talked about testing the solenoid and battery. The next step I had to undergo was testing the starter motor. This whole process is described below.
Removing the Starter
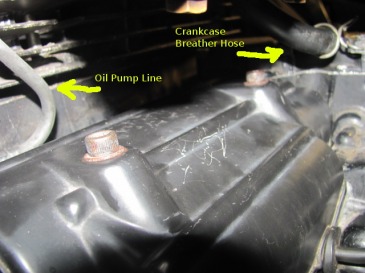
Figure 1: The starter motor sits under a black plastic cover as shown.
Before removal, the crankcase breather hose and oil pump line
need to be disconnected and moved to the side.
Before removal, the crankcase breather hose and oil pump line
need to be disconnected and moved to the side.
The first thing I had to do to test the starter was remove it from it's position on the bike. When the starter motor is installed, the gear that it drives remains connected to the starter clutch. This means that if there is something wrong with the starter clutch (jammed gears), the starter motor won't turn even if it is functioning optimally. Thus, I needed to disengage and remove the starter motor entirely to test it in an isolated manner.
The starter motor on the XS750E rests under the carburetor which sits just under the gas tank. Essentially, the starter motor sits on top of the oil pan and is covered by a piece of plastic. The starter motor location is depicted in Figure 1. Also notice that I pointed out the crankcase breather hose and the oil pump line in Figure 1. These two lines needed to be disconnected and moved off to the side in order to remove the starter cover and starter.
The starter motor on the XS750E rests under the carburetor which sits just under the gas tank. Essentially, the starter motor sits on top of the oil pan and is covered by a piece of plastic. The starter motor location is depicted in Figure 1. Also notice that I pointed out the crankcase breather hose and the oil pump line in Figure 1. These two lines needed to be disconnected and moved off to the side in order to remove the starter cover and starter.
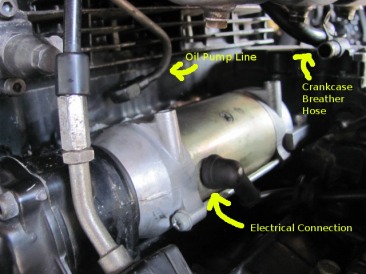
Figure 2: The starter installed but uncovered.
Once the two hoses were unscrewed and moved the the side, I could undo the two Allen bolts on top of the starter cover. With the two bolts removed, I started to wrangle the starter motor cover loose. Now, it needs to be noted that the starter motor cover is a bit awkwardly shaped, and it needs to be wiggled and rotated in order to get it loose. The manual for my bike instructed me to remove the gas tank and carburetor in order to ease access to the starter motor. I felt this was unnecessary which is why I had to wiggle the cover so much to get it loose. I will note, however, that I did remove the air filter in order to give myself some more room to work. Figure 2 shows the starter motor installed in the bike with the cover removed. Notice the both the breather hose and pump line are unbolted at the end and moved off to the side.
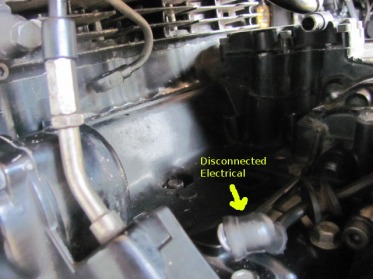
Figure 3: Location of the starter motor with the starter removed.
Upon the first removal, this area may be dirty and need cleaning.
Upon the first removal, this area may be dirty and need cleaning.
With the cover removed, removing the starter motor became a bit of an art. First off, I had to remove the two mounting bolts at the far end of the starter (under the breather hose). These two bolts also act as grounding bolts for the starter, thus completing the starter system circuit. Finally, I needed to disconnect the electrical connection (which connects to the solenoid). This allowed me more freedom of movement when wrestling with the starter motor.
With all of the connections and bolts removed I began to disengage the starter motor from the starter clutch. In order to do this, I pushed the starter motor away from the clutch, towards the crankcase breather hose. This took some force, but I finally felt the gears slip apart as the starter motor popped loose (you can also use a pipe and hammer to tap on the end of the starter to pop it loose, but be very gentle). With the gears disengaged, I had to twist and lift the motor to get it out completely. I found the best method for removing the starter to be lifting the the far end as much as possible while wiggling the whole motor right and left. With enough fiddling, the starter popped out and I was able to manipulate it out of the cramped space of it's enclosure. Figure 3 depicts the starter motor location with the motor removed entirely. Notice that I left the electrical connection where it was so that I could use it for testing later on.
With all of the connections and bolts removed I began to disengage the starter motor from the starter clutch. In order to do this, I pushed the starter motor away from the clutch, towards the crankcase breather hose. This took some force, but I finally felt the gears slip apart as the starter motor popped loose (you can also use a pipe and hammer to tap on the end of the starter to pop it loose, but be very gentle). With the gears disengaged, I had to twist and lift the motor to get it out completely. I found the best method for removing the starter to be lifting the the far end as much as possible while wiggling the whole motor right and left. With enough fiddling, the starter popped out and I was able to manipulate it out of the cramped space of it's enclosure. Figure 3 depicts the starter motor location with the motor removed entirely. Notice that I left the electrical connection where it was so that I could use it for testing later on.
Initial Starter Testing
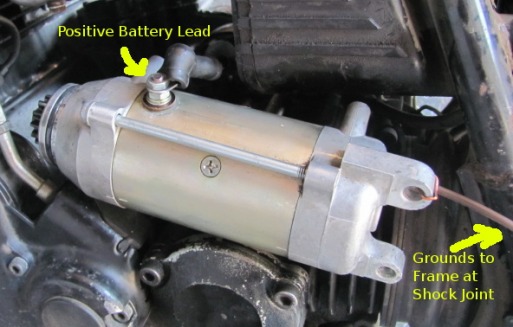
Once I had the starter removed, I could hook it up to various places in the electrical system to test it out. In order to work, the starter motor needs nothing more than a current supplied to it's electrical connection (the screw on the side) and a ground path connected to it's case. That said, the first test I decided to try was connecting the motor directly to the battery. I still had the starter solenoid removed, so I simply took the positive lead from the battery that normally connects to the solenoid and connected it to the starter motor. This is depicted in Figure 4. In order to ground the starter case, I gutted an old piece of extension cord and stripped the ends. I wrapped one end of exposed copper around the mounting bolt eyehole on the starter motor. I wrapped the other stripped cord end around the nut that holds the rear shock to the frame. This was the nearest part of unpainted frame I could find, so it seemed as good as any. The entire set up is shown in Figure 4 and Video 1.
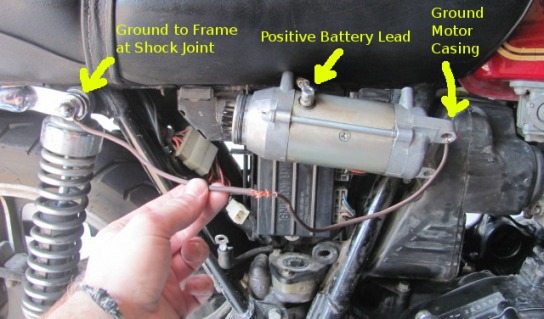
Figure 4: Initial starter motor testing set up. The primary connections that were made are called out by the arrows. The ground wire that I used for this test was an old piece of extension cord. If you don't have an old extension cord to gut, any type of conductive metal will work for grounding the motor to the frame. The thicker the cord, however, the better.
Video 1: Here you can see the starter motor connected in the discussed configuration
and spinning freely once connected.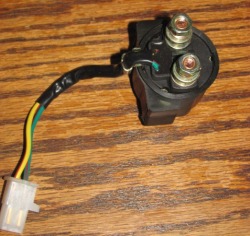
and spinning freely once connected.
With the motor connected directly to the battery and grounded as shown, the gear on the end spun right up. The starter motor whirred and seemed to be working just fine. I concluded that the primary disconnect in the system had to be due to the solenoid, since the motor engaged just fine when I bypassed the solenoid. As such, I ordered a new solenoid and awaited the part I needed to get my bike running again.
Replacing The Solenoid
Figure 5: My new solenoid, fresh out of the box.
Once my new solenoid arrived, I immediately rushed to install it because I was convinced that the solenoid was the primary problem with the bike. The solenoid that I received (pictured in Figure 5) was slightly different from the one that I had removed. It didn't have the square cross-section, so the distinction between the two connection posts was somewhat unclear to me. There were no instructions as to which post should be connected to which line, so I simply installed the solenoid in the configuration that the shape lent itself to. Essentially, the solenoid mounts to the frame of the bike with two rubber, horizontal sleeves. These sleeves wrap around two metal tabs on the frame and hold the solenoid in place. Since the two sleeves on my new solenoid only opened in one direction I slid it into place in the only configuration possible. I then connected the positive battery lead to the top post and the starter electrical connection to the bottom post, since this was the manner that the geometry lent itself to. I don't know if reversing the posts would cause problems or not, because I don't know the internal circuitry of the solenoid. However, I wouldn't recommend trying it.
With the new solenoid installed, I installed the starter motor by reversing the process described in the removal section. With everything connected (including all oil and breather hoses), I hit my starter switch excitedly. Once again, I was granted by nothing more than an ominous click and no engine turning. Apparently, I had jumped to conclusions about the solenoid and replaced it for little reason (though, it never hurts to have a new part in the bike). I needed to test the starter motor further to determine why it wouldn't turn the engine over. So, I went back to the removal procedure (as described above) and pulled the whole damn motor back out.
With the new solenoid installed, I installed the starter motor by reversing the process described in the removal section. With everything connected (including all oil and breather hoses), I hit my starter switch excitedly. Once again, I was granted by nothing more than an ominous click and no engine turning. Apparently, I had jumped to conclusions about the solenoid and replaced it for little reason (though, it never hurts to have a new part in the bike). I needed to test the starter motor further to determine why it wouldn't turn the engine over. So, I went back to the removal procedure (as described above) and pulled the whole damn motor back out.
Starter Switch Testing
At this point, I was a bit disheartened with this whole damn repair job. I had replaced all of the 'low-hanging fruit' problems thus far, and the rest of the job was going to get messy, fast. Nonetheless, the words of Robert Pirsig kept echoing in my mind regarding the necessity of gumption for motorcycle maintenance. I knew that my bike wasn't going to be running until I fixed it, and I was damn antsy to get riding again. That's motorcycle maintenance for you, no matter how hopeful you are that there will be an easy fix, the cold, hard reality of physics will impede your fantasies from coming true. The bike won't work until it is fixed right, no matter how much you want it to be otherwise. So, back to work.
With the motor removed a second time, I decided to become a bit more particular with my testing. I decided that, instead of hooking the motor directly to the battery to see if it spun, I would hook up the entire starter system, with the gears disengaged, and test everything. This would allow me to determine if the switch was sending the right signal to the solenoid which, in turn, would dump power to the starter motor and cause it to spin on command. Such a test would ensure that the solenoid, the starter switch, all of the cabling, and all of the electrical connections were working as expected. Essentially, it would allow me to isolate the problem to the interface between the starter motor and the starter clutch, rather than jumping to conclusions as I had done previously.
With the motor removed a second time, I decided to become a bit more particular with my testing. I decided that, instead of hooking the motor directly to the battery to see if it spun, I would hook up the entire starter system, with the gears disengaged, and test everything. This would allow me to determine if the switch was sending the right signal to the solenoid which, in turn, would dump power to the starter motor and cause it to spin on command. Such a test would ensure that the solenoid, the starter switch, all of the cabling, and all of the electrical connections were working as expected. Essentially, it would allow me to isolate the problem to the interface between the starter motor and the starter clutch, rather than jumping to conclusions as I had done previously.
Figure 6: This test configuration allowed me to test the entire starter system as it would function with everything installed, thus allowing me to isolate the problem to either the starter motor ground interface, or the interface between the starter motor and clutch.
In order to conduct this test, I decided to rest the starter motor down near the clutch lever, on top of the oil pan. This allowed me to connect the actual electrical connection to the starter motor that is connected to it when it is installed. However, since the mounting bolts would not be holding the motor to the bike, I still needed to ground the motor. Once again, I had to break out my trusty gutted extension cord and wrap it around the shock joint bolt. This set up is shown in Figure 6 and Video 2.
Video 2: This video shows the second setup for my starter
motor testing where I have the motor connected near its
mount location.
motor testing where I have the motor connected near its
mount location.
I also connected the solenoid to the bike in the way that it would be installed for normal operation. I used all of the cables that I intended to use once I got the bike back together. The only difference between this test and normal operation of the starter would be the ground cable and the engaging of the starter motor gear to the starter clutch.
With it all hooked up, I hit the starter switch up on the throttle handle of the bike and the motor whirred to life once again. When I released the button, the motor winded down as it should. Apparently, everything was working just fine and dandy. I had to come to one of three conclusions:
Well, after hitting the switch a few more times and watching how the starter motor reacted, I noticed something important. There was a very faint wisp of smoke that would tuft out of the back of the starter motor every time it spun up. While this was a bad thing, the news greatly excited me. This was evidence that something was wrong with the motor, and not the starter clutch. Since I didn't want to disassemble the entire gear assembly in the lower end of the engine, troubleshooting the starter motor was a much more appealing option.
My next step, therefore, was to disassemble the starter motor and inspect the brushes and armature to ensure the connections internal to the motor were clean and efficient. And that exact task will be the topic of my next blog entry.
Until I get that posted, thank you all for reading, and I hope this proved helpful and/or interesting to someone. Feel free to comment or contact me if you have any questions or thoughts.
Cheers,
Brady C. Jackson
With it all hooked up, I hit the starter switch up on the throttle handle of the bike and the motor whirred to life once again. When I released the button, the motor winded down as it should. Apparently, everything was working just fine and dandy. I had to come to one of three conclusions:
- The motor was unable to produce enough torque to turn the starter clutch.
- The mounting bolts were not properly grounding the motor when it was installed.
- There was something screwed in the starter clutch that was jamming the motor from turning when it was installed.
Well, after hitting the switch a few more times and watching how the starter motor reacted, I noticed something important. There was a very faint wisp of smoke that would tuft out of the back of the starter motor every time it spun up. While this was a bad thing, the news greatly excited me. This was evidence that something was wrong with the motor, and not the starter clutch. Since I didn't want to disassemble the entire gear assembly in the lower end of the engine, troubleshooting the starter motor was a much more appealing option.
My next step, therefore, was to disassemble the starter motor and inspect the brushes and armature to ensure the connections internal to the motor were clean and efficient. And that exact task will be the topic of my next blog entry.
Until I get that posted, thank you all for reading, and I hope this proved helpful and/or interesting to someone. Feel free to comment or contact me if you have any questions or thoughts.
Cheers,
Brady C. Jackson
0 Comments
Your comment will be posted after it is approved.

 RSS Feed
