Introduction:
Howdy Again Everyone,
So I haven't been out riding my motorcycle for part of June or any of July. The primary problem was the starter motor on the motorcycle. Between waiting for parts, trying different fixes, and throwing wrenches in frustration across the garage, the repair took me just over a month to complete.
I documented the entire process with my camera so that I could write about the work here. I am hoping that anyone who has had problems working on vintage Yamahas (especially the starter system) will find some useful information here. As such, this will be a very detailed posting. I broke it up into three pieces to make things more manageable. You'll see Part II and Part III written later this week hopefully. Until then, I hope this is enough to tempt your appetite.
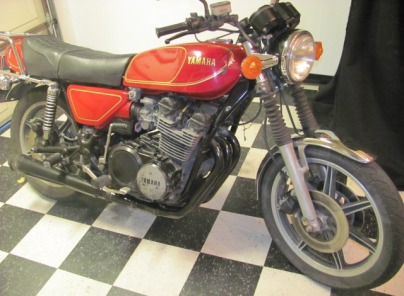
Awaiting repairs....
The Problem:
So, basically, my motorcycle (1978 Yamaha XS750E) has had some trouble starting since I bought it a year ago. When the weather is warm, the birds are chirping, and the stars are aligned, the old girl fires up with little trouble. However, on cold days, starting can be a bit of a pain in the ass. On cold and wet days, it can be downright impossible. Many of my coworkers can attest to how much fun it is watching me jump up and down on the kickstarter on a wet, rainy day in Santa Maria.
However, this was all pretty manageable until about a month ago. A few weeks back, I was going to make a ride up to Sonora for the second time (about 300 miles from Oceano). Unfortunately, I made it two miles to the gas station and couldn't get my bike to restart reliably. I thought it was the ignition timing so I took the time to retune my engine and that got me running, mostly, for another week or so.
Finally, the starter system gave out in the end of June. I had some trouble with my bike on a steep gravel rode and had dropped it. This was the last straw for the starter because I ended up having to roll start the machine to get it back home. Once it was parked in my garage, I turned off the machine, but left the key in the ignition. Upon hitting the electric start button, all I heard was an ominous "click" and the engine refused to turn over. My bike was officially on strike until I gave it some much needed maintenance. It was time to break out my manual and toolbox and get to work.
Deductions From The Symptoms:
So, basically there were a few things I knew before going into the troubleshooting. First, I knew that my bike had been dropped. As such, I knew something could have been cracked, fractured, or otherwise broken. I also knew that the engine itself was running fine because I had roll started the bike and ridden it home. That said, I could rule out the possibility that the engine had seized or some other catastrophic failure had occurred. What I didn't know, however, was whether or not the gear assembly that connects the starter to the main transmission (starter clutch) was okay. However, the disassembly and repair of the starter clutch is a very time consuming, complicated repair. As such, I decided that would be the last thing I would work on if it came down to it.
I also thought that I knew that power was not able to get to the starter motor from the battery. I erroneously jumped to the conclusion that, since the motor was not spinning, electricity was not getting to it. Of course, I only discovered this was an erroneous assumption much later in the repair process. Not jumping to conclusions is an important lesson that I find myself reminded of time and again in life. Finally, I knew that when I clicked the electric starter button on the handle, I could hear a distinct clicking. This told me that something was happening in the ignition system. Though, what that something was still alluded me.
So, in summation, I knew:
- the starter motor was not turning,
- the ignition system clicked when I pressed the electric starter,
- I could run the engine by roll start.
- Starter System:
- the battery
- the starter solenoid (depicted in Figure 1 below)
- the starter motor
- the electric starter switch on the handle
- starter clutch
- Ignition System:
- the transistorized ignition unit
- the ignition coils
- the spark plugs
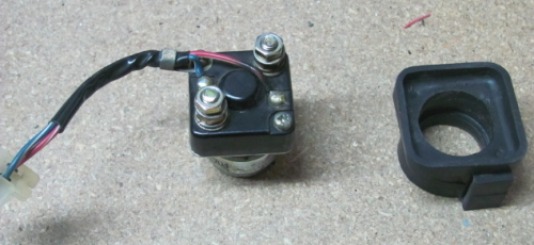
Figure 1: Starter solenoid removed from my bike. You can see the two posts that connect to the positive battery terminal (upper right nut) and starter motor (lower left nut) as well as the two leads that connect the solenoid to the starter switch (blue and red).
So I was left with some options on what I could start troubleshooting first. Essentially, the two systems outlined above work together to start the engine of a motorcycle. The starter system turns the pistons in the engine by spinning them with the starter motor. This motion pulls a vacuum through the fuel system, pulling gasoline into the cylinders. The ignition system then sends a high voltage to the spark plugs in a proper timing sequence (managed by the ignition unit) causing the gap in the plugs to arc. This ignites the fuel in the combustion chamber and further drives the engine to turn until it gets into a proper sequence and starts idling, at which point the engine is started.
Well, I decided to start troubleshooting the electric starter system because I wasn't getting any engine in the motion in the first place (and because my motorcycle mentor instructed me that was probably the problem). I understand now that if the problem was in the ignition system, the engine would have been turning, but I just wouldn't have been getting any combustion.
Thus, the next step in the troubleshooting process was to test the components of the starter system that were easiest to access, and cheapest to replace. This is the next step because one of the secondary goals of motorcycle maintenance is to minimize the effort put into repairing the machine. This is not due to laziness, but because rebuilding, replacing, or otherwise fixing and entire component that is not broken can cause further problems and cost a lot of time and money. So, my primary methodology is to start with small and simple repairs and work my way up the complications ladder until the problem is fixed.
The Battery:
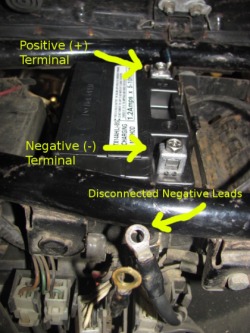
Figure 2: New battery in my XS750 with negative
leads disconnected for safety
leads disconnected for safety
The first item on my list of potential failed components was the battery. I've had battery troubles with this bike in the past. In fact, when I first purchased the bike, I had to buy a new battery (from Wal Mart) within a week just to get the machine running. Well this $30 battery from Wal Mart had now been in the bike a year, and had just been dropped on its side. I was hoping that the battery had, therefore, failed, and all I would have to do to get the bike started was replace the battery.
So I tried a few tests to see if the battery was the problem. First, I broke out my trusty multimeter and checked the potential across the terminals (this is called voltage by most people, but the correct term is electric potential). Well, the battery had 12.4 volts across the terminals. While this is probably enough for ignition, it is a bit lower than is preferred (12.7 volts is ideal). As such, I was hopeful the battery was simply not putting out enough current (amps) to turn the starter motor. So, I tried a few things. First, I tried jump starting my bike with Thomas's bike (which you're not supposed to do, it's better to jumpstart from a car). Jump starting didn't work, but I decided to replace the battery anyways because the one I had was cheap and old and certainly wasn't holding the ideal charge.
As such, I purchased a new battery that I knew was high quality (from Grover Beach Powersports, one of the best motorcycle shops on the central coast). I trickle charged the battery, hooked it up, and still got nothing but an ominous click. It was time to get out out of denial and start pulling apart the rest of the starter system. The next item on my list to evaluate was the solenoid. However, before getting elbow deep in starter electronics, I did the wise thing and disconnected the negative terminal on my battery (as shown in Figure 2). This prevents a full circuit from being completed in the starter system, and it is a smart idea while working on any electronic circuit. Failure to disconnect the negative terminal of the battery can lead to electrocution while testing other components. While a 12 volt motorcycle battery is not likely to kill you, death is possible, and electrocution will give you a helluva tickle if you're not careful. So, step 1 was safety.
Initial Solenoid Testing:
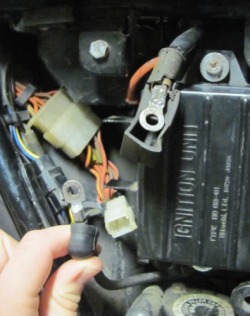
Figure 3: Starter solenoid location shown with
the starter removed. I am holding the wire
that connects to the starter motor in the picture
the starter removed. I am holding the wire
that connects to the starter motor in the picture
The next test needed to be conducted on the starter solenoid. The starter solenoid on the XS750E is located on the left side of the bike (when facing the front of the bike), just under the seat. You have to remove the plastic fixture on this side to get at it. This isn't difficult. Essentially, you just pop the bottom part of the fixture free by hand and then wiggle it until the top part slides off. With the plastic off, you will see a tangle of wire harnesses, a black box labeled "IGNITION UNIT" and the solenoid. This location is depicted in Figure 3 with the solenoid removed.
The solenoid performs an interesting role in the electrical system of a bike. Essentially, it acts as a transformer coil that steps up the output from the battery in order to deliver sufficient power (potential times current [volts * amps]) to the starter motor to force the starter motor to turn. It consists of two electrical posts, one for the positive terminal of the battery, and one for the wire connecting to the starter motor, that, when bridged, force the starter motor to turn. The posts are bridged upon a signal from the electric starter switch. In Figure 4, you can see both of the posts clearly marked, as well as the wire harness that connects to the electric starter switch up on the throttle handle of the motorcycle.
The solenoid performs an interesting role in the electrical system of a bike. Essentially, it acts as a transformer coil that steps up the output from the battery in order to deliver sufficient power (potential times current [volts * amps]) to the starter motor to force the starter motor to turn. It consists of two electrical posts, one for the positive terminal of the battery, and one for the wire connecting to the starter motor, that, when bridged, force the starter motor to turn. The posts are bridged upon a signal from the electric starter switch. In Figure 4, you can see both of the posts clearly marked, as well as the wire harness that connects to the electric starter switch up on the throttle handle of the motorcycle.
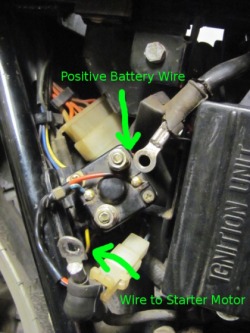
Figure 4: Starter solenoid with both
posts disconnected.
posts disconnected.
Once the nature of the solenoid is properly understood, it becomes pretty easy to test. Essentially, a voltmeter should be connected between the two posts while both the battery and solenoid are connected. When the starter switch is not connected (button not pressed on handle) the voltage reading should display the same reading as exists between the two terminals of the battery. This is because voltage is a measure of electric potential between two points in a circuit. Thus, if there is no power to the starter motor (bottom left post) but there is power coming from the positive terminal of the battery (upper right post) the electric potential that exists between the two posts is equal to that which exists between positive terminal and the ground of the battery (negative terminal).
Upon depressing the starter switch button, the reading between the two solenoid posts should drive to 0.0 volts. This tells you that the gap was effectively bridged and current is now flowing from the positive battery terminal, through the solenoid, and into the starter motor. Now, ideally, if this reading pattern does occur, the motor will start to turn (it has power after all), and the engine will begin to turn over. Mind you, the negative terminal of the battery does need to be connected for this test. As such, when performing this test, I connected the battery into what I call a "quick-disconnect" configuration. This configuration is shown below in Figure 5.
Upon depressing the starter switch button, the reading between the two solenoid posts should drive to 0.0 volts. This tells you that the gap was effectively bridged and current is now flowing from the positive battery terminal, through the solenoid, and into the starter motor. Now, ideally, if this reading pattern does occur, the motor will start to turn (it has power after all), and the engine will begin to turn over. Mind you, the negative terminal of the battery does need to be connected for this test. As such, when performing this test, I connected the battery into what I call a "quick-disconnect" configuration. This configuration is shown below in Figure 5.
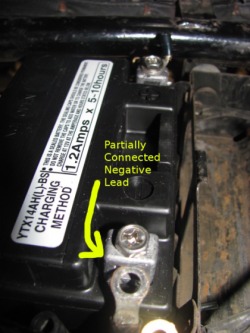
Figure 5: Notice how the negative terminal is
only barely connected to the groundwire. This
allows you to grab the goundwire quickly
and pull to break the circuit in the event of an
emergency (electrocution).
only barely connected to the groundwire. This
allows you to grab the goundwire quickly
and pull to break the circuit in the event of an
emergency (electrocution).
The quick-disconnect configuration of the battery basically consists of just barely touching the groundwire of the motorcycle to the negative terminal. This allows the mechanic to jostle, bump, grab, or otherwise jar the wire into disconnecting if he finds himself as part of the circuit (getting his ass electrocuted). It gives the mechanic a failsafe to keep himself from getting shocked into a heart attack or some other terrible fate.
Well, with the battery partially connected, and the voltmeter hooked to the two posts of the solenoid, I went ahead and tested the electric switch up on the handle. I saw the potential across the solenoid gap drop to 0 volts and, thus, concluded that the solenoid and electric starter switch were working as desired. The problem had to lay somewhere else.
The next component of the starter system to test, therefore, was the starter motor. This process required many different tests and quite a complex disassembly. Thus, the starter motor work will be the subject of Part II of this project.
Until that post goes up, I'd like to thank you all for reading and invite you to post any comments or questions you have below. You can also find other methods of contacting me on the contact information section of my website. I'll happily do my best to answer any questions or thoughts you have. So I hope to hear from you all soon.
Thanks for reading,
Brady C. Jackson

 RSS Feed
